
Get the Plugin Here
Watch an intro video here.
ONTRAPORT to Wishlist Member is a plugin (OP-WL Plugin) that connects the ONTRAPORT CRM with the Wishlist Membership plugin for Wordpress. This allows you to use ONTRAPORT for your email correspondence and for you to use ONTRAPORT order forms for purchases that will create a membership within Wishlist. This also includes a feature to cater to declined billing attempts that will remove access to the Wishlist membership if a payment is missed.
The simple way to explain the plugin is that each membership level has a tag. If this member tag is added then the membership is added in WL. If this same tag is removed from the contact, then the membership is removed. There is also the declined tag that will pause their membership when added and restore their membership when removed. The last feature of the plugin is that you are able to update the WL password from within ONTRAPORT. Below is an outline of how this plugin works.
How this works and the setup can be broken down into two categories:
- What you need to do in your WordPress site
- What you need to do in your ONTRAPORT Account
WordPress
There isn’t much you need to do in WordPress for setup or for management of using the OP to WL plugin.
- Install the plugin. The plugin isn’t currently available directly from WP so you will need to install it from your computer.
- After the plugin is installed you can access the settings for OP-WL Plugin from the settings menu on the left panel in WP.

- Enter the API Key and ID. These can be obtained within your ONTRAPORT account.
- Enter WL-Helper as the section name and WL_Password as the name of the field for the password.
- Save settings
ONTRAPORT
Now that we have the API Key and ID from the ONTRAPORT account in the settings of the OP-WL Plugin we have it connected to our ONTRAPORT account. The plugin doesn’t do anything by default. We have to program the automation from within ONTRAPORT.
We will accomplish this by using Active Response Rules. We will use the Ping URL option to send data to the OP-WL Plugin. The URL used in combination with the data sent in the process will provide the OP to WL plugin with the information it needs in order to perform the triggered action. We will create a series of rules that will perform the different actions that we need to have happen. In order to trigger these rules we will use tags that we can add to the contact record. This way when we add the tag to a contact they system will trigger the rules and will automatically perform the needed action within Wishlist. There will be two tags we will use for each membership.
Say we have three membership levels. Silver, Gold, and Platinum. For the sake of example let’s say that those are exactly the names of the membership levels created within Wishlist. I will use Silver as an example for the tag configuration.
The first tag is for the membership itself. It uses the format “WL > “Name of Membership Level””. With the example of the Silver membership it would read “WL > Silver”.
The second tag is for declined payment management and will be the same but with PAYF added to the end of the tag. This example would be “WL > Silver PAYF”.
We will use these two tags to trigger the rules that will operate the integration.
There are 5 Active Response Rules we will need to make this work. Here is a list of those 5 Rules:
- WL_Helper: Add Membership
- WL_Helper: Remove Membership
- WL_Helper: Add PAYF tag
- WL_Helper: Remove PAYF tag
- WL_Helper: Update Password
I will review each independently and include the Ping URL used for the rule.
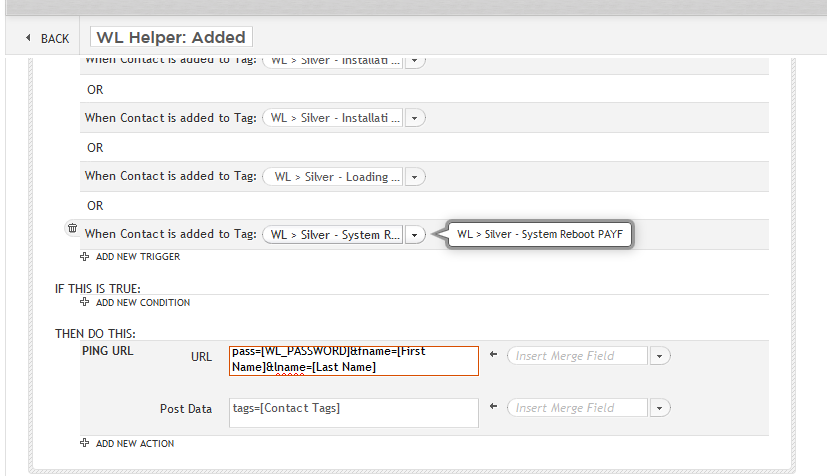
1. WL_Helper: Add Membership
This is the rule used to add the memberships based on the addition of the tag from within ONTRAPORT. We will only need a single rule for all membership levels being used. In this rule we will use the trigger:
Contact Added to Tag
We will choose the membership tag “WL > Silver” for example and add an additional trigger for each additional membership level being used. This way the rule will trigger whenever any of our membership tags are added to the contact. We do not need a condition for this rule.
In the outcome we will choose Ping URL and enter the following URL:
http://www.wordpressURL.com/?oa_wl_call=wlimport&email=[Email]&pass=[WL_PASSWORD]&fname=[First Name]&lname=[Last Name] (Replace wordpressURL with the URL of the integrated WP site)
We will also select contact tags within the post data. Post data = tags=[Contact Tags].
The rule will look like this:
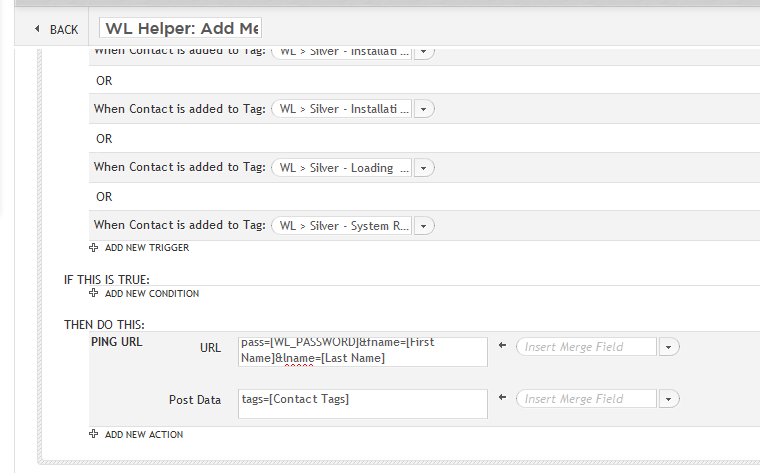
This rule will cause the WL membership to be created via the Ping URL rule any time a membership tag is added.
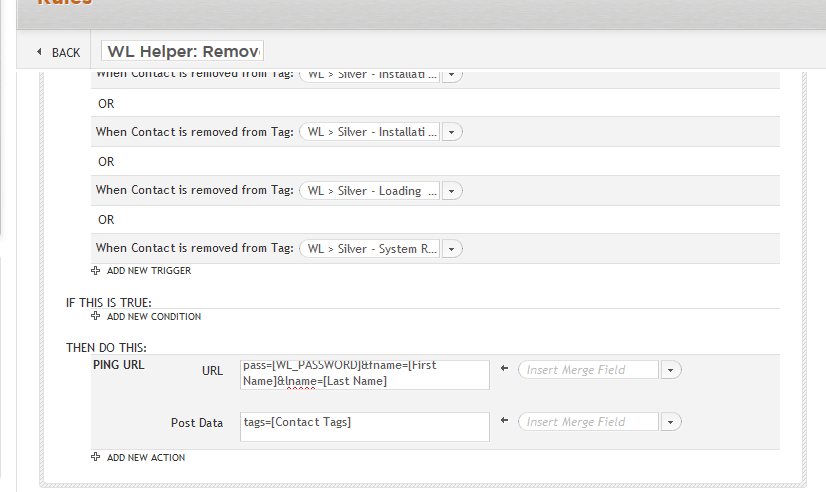
2. WL_Helper: Remove Membership
This rule will be the reverse of the add membership rule. We will set the trigger listing each tag but as Contact is Removed from Tag this way the rule is triggered each time the tags are removed from a contact. We do not need a condition for this rule either.
The outcome again will be Ping URL and you will use this URL:
http://www.wordpressURL.com/?oa_wl_call=wlremove&email=[Email]&pass=[WL_PASSWORD]&fname=[First Name]&lname=[Last Name]
We will again select tags for the post data: Post data = tags=[Contact Tags]
The rule will look like this:
3. WL_Helper: Add PAYF tag
This rule is used to trigger the suspension of a membership when a contact has failed to make their payment for their membership. The idea is that when this tag is added to a contact that it will essentially pause their membership access to that membership level until the tag is removed.
The format for this rule will be the same as the Add membership rule. We will use the trigger Contact is Added to Tag and choose our “WL > Silver PAYF” tag and any other PAYF tags for each membership level included. There is no need for any conditions on the rule.
For the outcome we will use the exact same Ping URL as in the add membership rule:
http://www.wordpressURL.com/?oa_wl_call=payfcheck&email=[Email] (Replace wordpressURL with the URL of the integrated WP site)
We will also select contact tags within the post data. Post data = tags=[Contact Tags].
The rule will look like this:
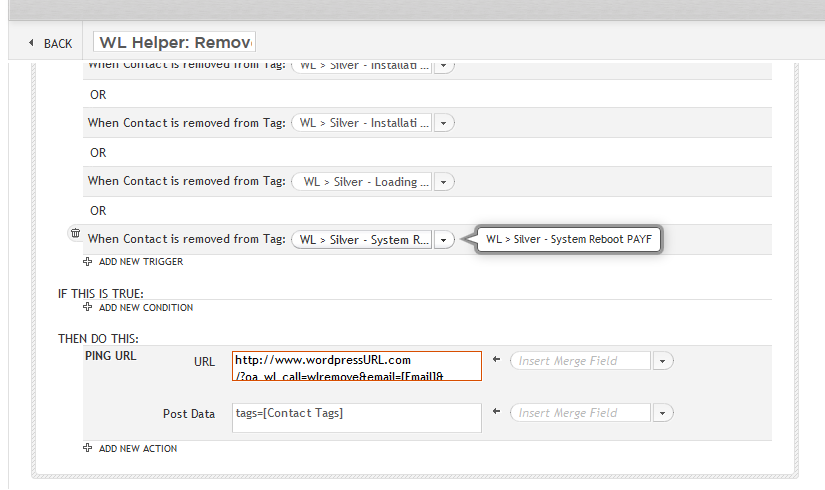
4. WL_Helper: Remove PAYF tag
This rule is responsible for restoring membership access when a contact has the PAYF decline tag removed from their contact record. This rule uses the same format and Ping URL rule as the remove membership rule.
We will use the trigger Contact is Removed from Tag and select our PAYF tags for each membership level and again we do not need any conditions in the rule.
For the outcome we will choose Ping URL and use the same data from the Remove Membership rule:
http://www.wordpressURL.com/?oa_wl_call=payfcheck2&email=[Email]
We will again select tags for the post data: Post data = tags=[Contact Tags]
The rule will look like this:
5. WL_Helper: Update Password
This is the final rule in the series and is responsible for allowing the Wishlist password to be updated from within the ONTRAPORT contact record. Any time the information in the WL_Password field is updated it will trigger this rule to update the password within Wishlist via the Ping URL rule.
The trigger will be Field is Updated. We will choose WL_Password as the field. We do not need any conditions in this rule.
For the outcome we will choose Ping URL and use the following:
https://www.wordpressURL.com/?oa_wl_call=changepass&email=[Email]&pass=[WL_PASSWORD]&fname=[First Name]&lname=[Last Name]
This will send the new password information over to Wishlist and make the change within the system.
With each of these rules in place and the plugin installed the set up is complete. If new membership levels are added going forward then they are to be added to the list of triggers within the rule. Only the 5 ONTRAPORT Rules above will be needed for the integration.